


Peanut Butter and Jelly
My preschool students who are studying WELCOME to Learning World PINK absolutely LOVE the Student CD. They listen to it in the car all the time. They (and their younger siblings) know all of the songs from the book long before we ever “play with” them in class. They especially love the Peanut Butter and Jelly song which is in Unit 8. It’s a real favorite. And it is even more fun for the students because the final activity with the song is making real peanut butter and jelly sandwiches! None of them had had peanut butter and jelly sandwiches before, so they really looked forward to this.
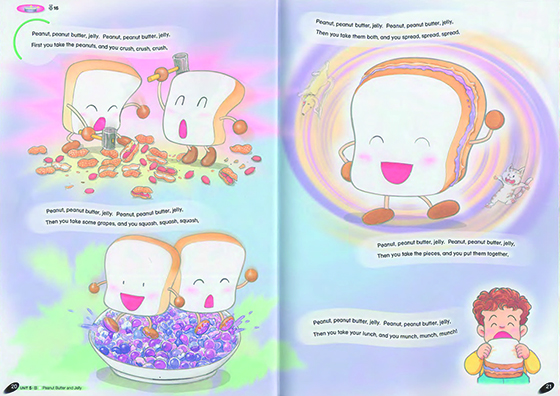
The first thing we did was to sing the song using gestures. We used gestures almost like in the sample video.
The kids loved singing the song with the gestures!
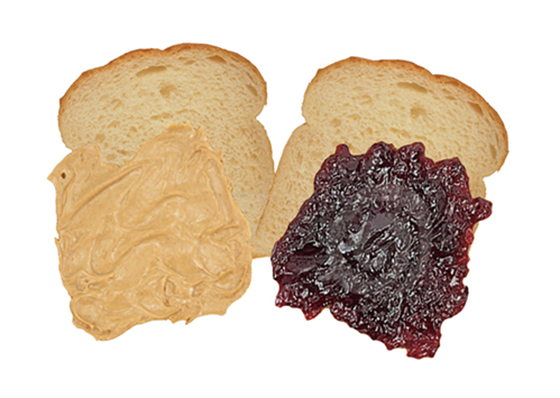
The next thing is that I like to take the gestures a step further. I make a set of “bread”, “peanut butter”, and “jelly” for each of the kids. My teacher’s set is laminated for longer use, but the students’ sets are not. To make them, I print the sheets on paper, use “tape nori” on one half, fold the paper in half so the sides line up, and cut out the parts.
 Peanut Butter and Jelly PDF
Following the lines of the song, students:
- Pick up the peanut butter and make the crushing gesture.
- Pick up the jelly and make the squashing gesture.
- Pick up one piece of bread, put the peanut butter on it, and make the spreading gesture.
Pick up the other piece of bread, put the jelly on it, and make the spreading gesture. - Put the pieces of bread together with the peanut butter and jelly in the middle.
- Pretend to eat their sandwich.
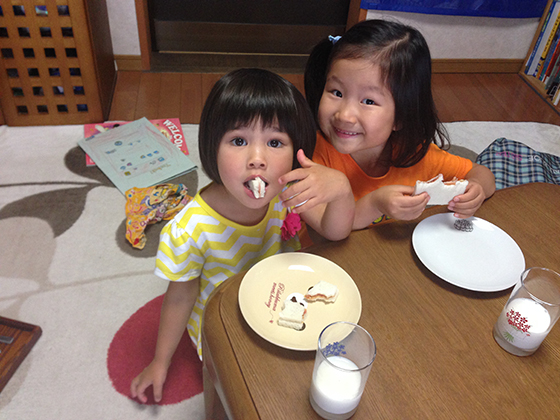
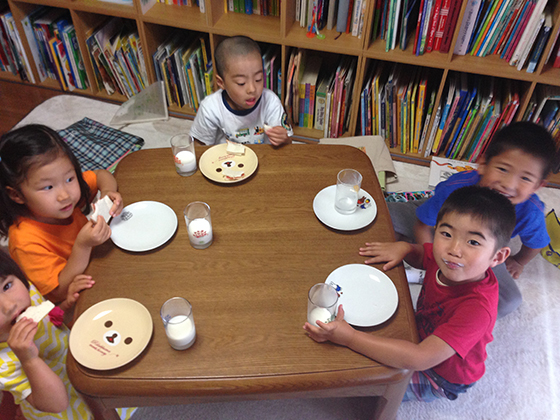
The students had a lot of fun with this. But the next part was even more fun! Using skinny sandwich bread, we made real peanut butter and jelly sandwiches. With the song playing on repeat in the background, we made sandwiches. When the verse for the step we were on played, I would emphasize it and the students would say it. They were very happy to have peanut butter and jelly sandwiches with a glass of milk.
We also used language like:
- Bread, please. Peanut butter, please. Jelly, please. Milk, please.
- Thank you.
- Can I have more?
- It was good. It was yummy.
This is one of my favorite lessons because it is really fun for the students, they get to really use the language and do something with it. Also, it is fun for me to share a bit of my childhood with them. They can get a bit of American culture.
** I did make sure to ask the moms about food allergies and make sure it was okay to feed them in the couple of weeks before the lesson with food.
Where? When? How?
I love using games in class! There are a couple of really great points about using games.
- Students have fun while practicing the target language.
- Games are a great chance for teaching and using “other” English.
This “other” English is stuff like negotiating whose turn, understanding the rules of the game, and checking that they’ve understood the rules while playing the game. In the past, I used to use more Japanese in class than I do now. I would sometimes explain the rules in Japanese so that we could spend more time practicing the target language. But then I went to one of Matthew de Wilde’s presentations and it made me think about the importance of this “other” language. So, now I use less Japanese in class.
This game is one that I developed with Learning World 2, Unit 6, Lesson 2. I used the Activity Sheets for this lesson to introduce the language and had the students sort the cards into the correct categories of “where”, “when”, and “how”. This was great, but I wanted to make a game to practice more. I often use small playing cards to play games. I have lots of games for pairs and a good one for 4-card sets, but this time I had 3 categories… I finally came upon the perfect idea: Clue!
The original Clue game is a murder mystery game. Someone has murdered the owner of the mansion. The board has nine rooms, there are characters and weapons. The winner has to correctly guess who did it, with what, and where.
The Activity Sheets had 9 places. Perfect! So I made a new game. The basic rules of the game are that you take one card from each category and hide them in an envelope. That is the answer. You deal out the remaining cards. Any card that you have in your hand is not in the envelope, so you can mark it off on your score sheet as not being the answer. During the game play, students move from room to room. Each time, they enter a room, they can make a guess. The guess includes one item from each category. Students have to guess by saying something like:
“Let’s go to the park on Sunday by bike.”
If the first student to their left has one (or more) of the cards, they have to show it just to the student making the guess. And if they have more than one, they can pick the one to show. If the first student does not have any of the cards guessed, then it moves on to the next student. As you see cards from other students, you can mark them off on your list. When only one item is left you know that that one item is the answer for that category. Once you know all of the items, you can make a final statement. If you are right, you win. If not, the rest of the students continue playing.
We didn’t completely finish the first game in the 50-minute class. It took them about half of that time to really get the rules. Once they got the rules, it was like a light bulb went off. The next class, we spent the entire 50 minutes playing the game. With 4 people playing that is about how long it took. You might think, “50 minutes just playing one game?!?” But the students loved it and were having fun. They were using lots of English! And not just the target language. There were things being said, like:
“Whose turn is it?”
“Do you have one of those cards?” “Do you have one?” “I’m sure you have it!”
“No, I don’t have one.” “Oops. I do have one.”
“Hey! You have that card!” (At the end of the game, after a student had made a mistake during the game.)
Here is everything you need to make the game yourself, including detailed instructions for making and playing the game!